Extending Functionality
Introduction to Aetheria's plugin system
Aetheria's plugin system differs from in its approach to extension depending on the type of plugin. There are two types of plugins:
- Backend plugins: are plugins that may be shipped with Aetheria and are specific to the backend.
These plugins are loaded by the backend at runtime and they are not exposed to the frontend.
The simplest backend plugin is a NestJS module that is dynamically registered but plugins may become more complex and provide almost unlimited functionalities. - Frontend plugins: Frontend plugins are plugins that are loaded by the frontend at runtime and are exposed to the
user in the UI or using other methodologies.
The simplest frontend plugins is a Next.js library exporting React components that are registered in the IOC container and already used or setup in the base installation.
Plugins may become far more complex and also register new routes and pages in the admin panel or other locations.
Installing and activating plugins
Whatever the type of plugin, they are all installed and activated in the same way. Plugins are installed via the cli shipped in both the backend and frontend packages.
- Backend
- Frontend
# local installation
nest start cli plugin install -n <plugin-name> -r <plugin-resolution-path>

# npm installation
nest start cli plugin install -n <plugin-name> -N

# tarball installation
nest start cli plugin install -n <plugin-name> -r <tarball-plugin-path> -t
# local installation
./apps/frontend-cli/bin/run plugin install -n <plugin-name> -r <plugin-resolution-path>

# npm installation
./apps/frontend-cli/bin/run plugin install -n <plugin-name> -N

# tarball installation
./apps/frontend-cli/bin/run plugin install -n <plugin-name> -r <tarball-plugin-path> -t
FAQ
Is there a way to install plugins without using the cli?
Yes, there is.
The cli is just a wrapper around a series of configuration tweaks that are required to install a plugin. Even though you can manually install plugins it is strongly discouraged to do so as the cli will take care of all the required steps for you without the risk of forgetting something.
Which is the difference between local, npm and tarball installations?
As you may have noticed, there are three different ways to install a plugin. The difference between them is the way the plugin is resolved and installed.
As of v1.0.x ships with tree resolution strategies:
- local: the plugin is resolved from the local filesystem. This is the default strategy.
- npm: the plugin is resolved from the npm registry.
- tarball: the plugin is resolved from a tarball file.
Do not rely on the tarball nor on the npm strategy until the publishing of the official APM as they are not yet
supported because of security concerns.
How do I know which strategy to use?
As of v1.0.x the only supported strategy is the local one.
The npm and tarball strategies are not yet supported because of security concerns.
As of the release of the official APM, the shipped plugin manager will choose the correct strategy for you based on the plugin and data available.
Activating plugins
As of v1.0.x installed plugins are always activated. In order to disable a plugin you have to uninstall it.
As of v1.1.x this behaviour will change and plugins will be installed and activated by default but they can be disabled without the need to uninstall them.
Creating a plugin
Plugins differs in their structure depending on the type of plugin, but they all share the same basic requirements.
Each plugin must have a package.json file with the following minimal structure:
{
    "name": "plugin-name",
    "version": "1.0.0",
    // optional fields
    "description": "A short description of the plugin",
    "authors": [
        {
            "name": "John Doe",
            "email": "[email protected]"
        }
    ]
}
Other fields such as description and authors may be present but they are not required.
- Backend
- Frontend
Backend plugins are NestJS modules that are dynamically registered at runtime. Anyway, the standard NestJS module structure is not enough for a plugin to be loaded by the backend.
All plugins in order to be loaded by the backend must be CommonJS plugins as Nest does not support yet ESM modules.
Ensure you're using the correct plugin type by setting "type": "commonjs" inside your package.json.
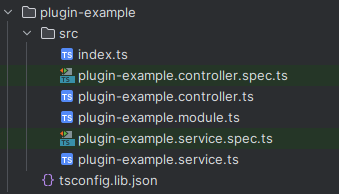
A standard NestJS library module looks like this:

If generated via the nest CLI usually the index.ts inside the src folder is not created.
This structure is anyway not enough, even if the index.ts file inside the src folder is created.
This is because in order to be automatically loaded at startup the plugin must export a default entrypoint from the root
of the library module.
This means that an additional index.ts file must be created in the root of the library module, aside the src folder.
A sample root index.ts file may look like this:
// Import the module from the src folder and export it as default entrypoint
import { PluginExampleModule } from "./src";

export default PluginExampleModule;

// Optionally (but suggested) also re-export all the modules and utilities from the src folder
// in order to enhance the developer experience
export * from "./src";
In our example we've created and index.ts file inside the src folder that acts as an entrypoint for the whole
directory, this is not a requirement and you can easily import single files as you'd normally do.
Depending on your setup your tsconfig.json file may need to be tweaked in order to allow the compiler to resolve the
src folder and the root index.ts as a whole. The simplest way to do so is to add the following lines aside the
compilerOptions object:
{
    "include": [
        "**/*"
    ]
}
If you've created your library module using the nest CLI you are already good to go, all its left to do is to build the plugin and install it.
All plugins must be built before being installed as they are not automatically built by the plugin manager. An un-built plugin will not be loaded by the backend.
An utility cli command is provided to build all plugins, inside the libs folder of the backend project you can run it
via npm run build:plugins.
Frontend can be constituted by two different parts:
- Next.js routes: the next.js routes are exactly the same as native routes for next.js and can be natively rendered as server components.
- React components: the react components are the same as the ones used in the frontend application but they are registered in the IOC container and can be injected as dependencies, this allows to replace the default components with custom ones without the need to modify the source code.
Next.js routes
Next.js routes are the same as the ones used in the frontend application, the only difference is that they are located
inside the routes folder of the plugin.

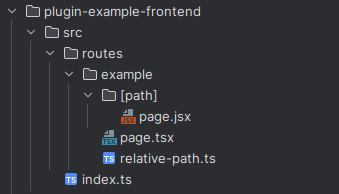
Inside the routes folder you can create the same folder structure as the one used in next.js standard application.
There is no need to use special references nor to import the routes anywhere, they will be automatically loaded by the
plugin manager.
The plugin manager will automatically load all the routes from all the plugins and merge them with the ones from the frontend application.
Routes path collision will be resolved by the plugin manager by giving priority to the routes registered first, meaning that if a route with the same path is registered by the frontend application and by a plugin, the frontend application route will be used.
If you want to override a route from the frontend application you can do so using React components.
React components
React components are simple react components that are registered in the IOC container and can be injected as dependencies in other components or pages.

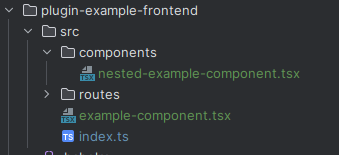
Registering components in the IOC container is done by simply exporting them from your library such as:
export * from "./example-component";
export * from "./components/nested-example-component"
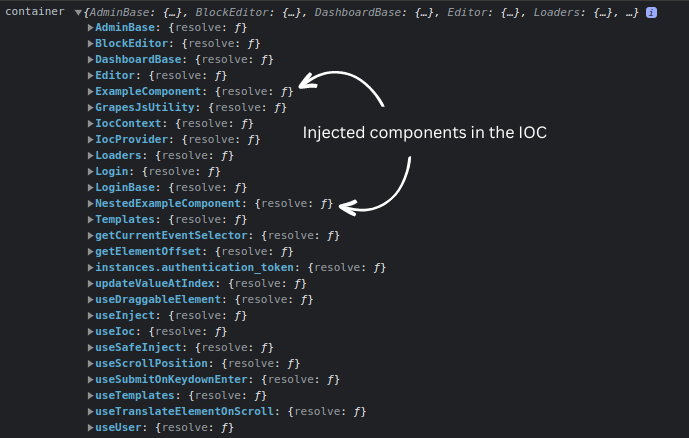
That will make the components available to be injected in other components or pages and visible inside the container:

The components are registered in the IOC container using the same name as the one used in the library module.
import { FC } from "react";

// exported as ExampleComponent in the IOC container
export const ExampleComponent: FC = () => {
    return <div>Example Component</div>;
}
import { FC } from "react";

// exported as NestedExampleComponent in the IOC container
export const NestedExampleComponent: FC = () => {
    return <div>Nested Example Component</div>;
}
If you want to inject for example an header on the dashboard homepage you can do that by creating a component named
DashboardHeader:
import { Header } from "@mantine/core";
import { FC } from "react";

export const DashboardHeader: FC = () => {
    return <Header height={50}>Dashboard Header</Header>;
};
and export it from the root index.ts file:
export * from "./components/dashboard-header";
Then as by default the component is already used if defined your brand new header will be automatically used in the dashboard homepage:
